Basic Concepts & Workflow
The most important business object in Firetask is naturally the task. Each task either belongs to the "General" task list, or to a project. As Firetask is a project-oriented task management app, projects also play an important role in the Firetask workflow.
Both tasks and projects have a status. Statuses range from Not Started over In-Progress to Completed. Both the General task list and each project define an explicit order of tasks; you can rearrange tasks easily via drag & drop. You can also manually control the order of tasks in a number of status or Focus-based lists such the first sections of the Today, Next, Agenda and Waiting views.
Tasks
You can create new tasks in nearly all views -- by tapping on the "+" icon in the top-right corner, or by double-tapping into an empty area of a task list, or by using the ⌘N keyboard shortcut on the Mac. By default the task's initial properties will match the current task list's constraints (e.g., if you create a task in the Inbox its List is automatically set to "Inbox").
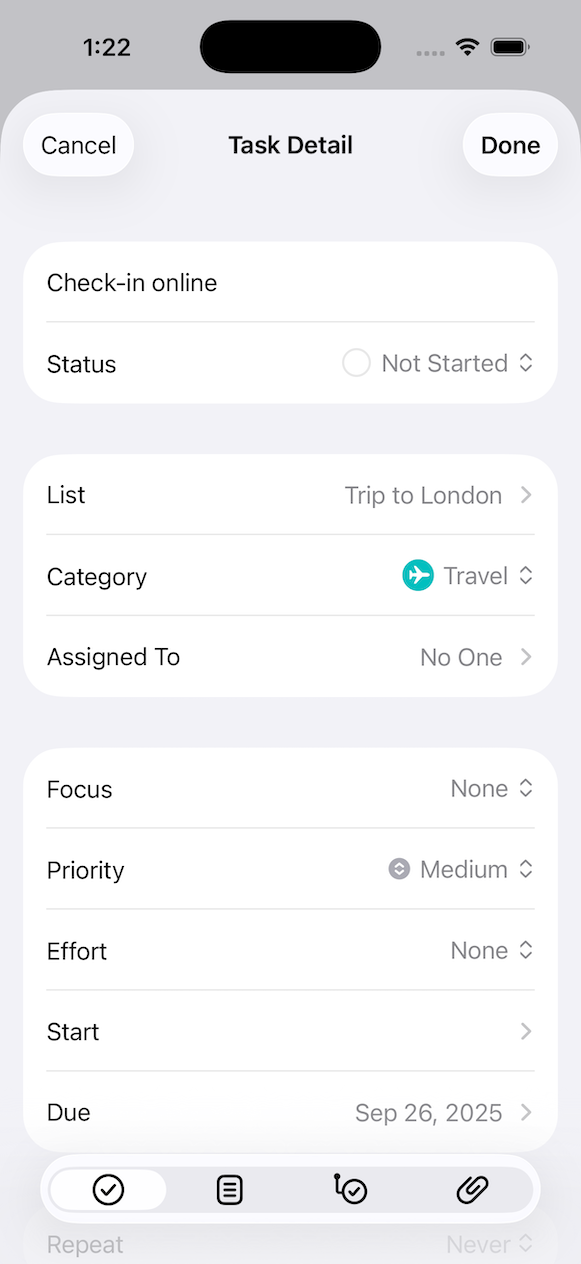
Let's take a closer look at some of the properties the task object supports:
- Title. The title of the task
- Status. The status of the task; only tasks with the statuses "Not Started" or "In-Progress" are considered to be currently actionable and are thus, shown in Focus views such as Today and Next (e.g, you typically do not want to be distracted by tasks that are currently On Hold)
- List. The list the task belongs to. There are pre-defined lists such as General, Inbox, and Someday as well as projects and templates.
- Category. An optional category for the task that can be used to provide a GTD context; if a task is assigned to a category the category indicator is shown in the category's color to the very right of the task title in all task lists
- Assigned To. You can assign a task to a contributor, or the a contact; if a task is assigned to someone it shows up in the "Waiting For" list
- Focus. By marking a task as focused you make the task show up in the "Focus" area in the view with the same name as the Focus value (Today, Next, Agenda, or Waiting).
- Priority. Not everyone works with priorities, but if you do you can choose from five color-coded priority levels from "Highest" to "Lowest". The default priority is "Medium" and intentionally not visualized.
- Start. By using a start date you can schedule tasks that do not have a due date to automatically appear on the Today or Next view without focusing them when it is time to start the task. A start date can also make sense in addition to a due date if it is a long running task
- Due. By selecting a due date for a task you ensure that the task does not show up in the Focus area before it becomes relevant. We intentionally do not provide due times, since we believe that a task that is also due at a certain time is actually an event and should go into your calendar. However, it is possible to set a reminder time
- Repeat. By specifying a repeat pattern you can define a repeating task. By default the next repeat date will be calculated based on the previous due date; if you check "after completion" it will instead be calculated based on the date you completed the task the last time
- Reminder. You can optionally set up to two reminders. If you do not provide a reminder date the task's due date, or today's date will be used by default
- Notes. Optionally you can describe your task in more detail in the task's Notes area. On the Mac you can find the Notes area on the second tab of the inspector
Tasks do also keep track of their creation date ("Created"), the time they were last modified ("Modified"), as well as their completion date ("Completed"). You can find the most relevant of these dates always at the very bottom of the task detail view.
As already mentioned earlier, the task's Status property also implements a part of the GTD workflow and can generally be used to control the life-cycle of a task:
- Not Started. Not Startede tasks are tasks that you have decided on, are shown in the General and project task lists, and can show up in the Focus area if they are currently relevant
- In Progress. In-Progress tasks work the same way as actionable tasks, but you are already working on them. We like this intermediate status, since it allows you to clearly see what work is already ongoing and what has not yet been started
- On Hold. Tasks that are On-Hold show up in General and project task lists, but never show up in the Focus area. You put tasks on-hold when you do not want to cancel a task, but you also cannot do anything about it right now (e.g., due to external dependencies)
- Completed. Completed tasks are no longer visible in General, or project task lists. Instead, they are shown on the "Completed" tab of the "Archive" view in reverse order of completion
- Canceled. Like completed tasks, canceled tasks do not show up in General, project task lists, or the Focus area. You cancel a task when you want to keep it around for reference, but you know that it is no longer relevant
The status of a task is visualized using a circular icon. In task lists you can advance the status of a task by single-tapping or clicking its status icon. Please note that "Not Startede" tasks become "In Progress" while, e.g., "Inbox" tasks become "Not Startede".
You can directly complete an open task by double-tapping/clicking on its status icon. You can make a completed task again actionable, or bring back canceled and deleted tasks simply by tapping or clicking its status icon. Other status changes are also easily possible by long-pressing the status icon on iOS, or using the right mouse button on the Mac in order to bring up a status menu.
Until up to Firetask 4, Inbox and Someday were also implemeted as statuses. Starting with Firetask 5, Inbox and Someday are implemnted as pre-defined lists.
It is also possible to convert a task into a project if it becomes too large. The conversion function will take over the project name, priority, category and notes as well as convert all to-dos to tasks of the new project.
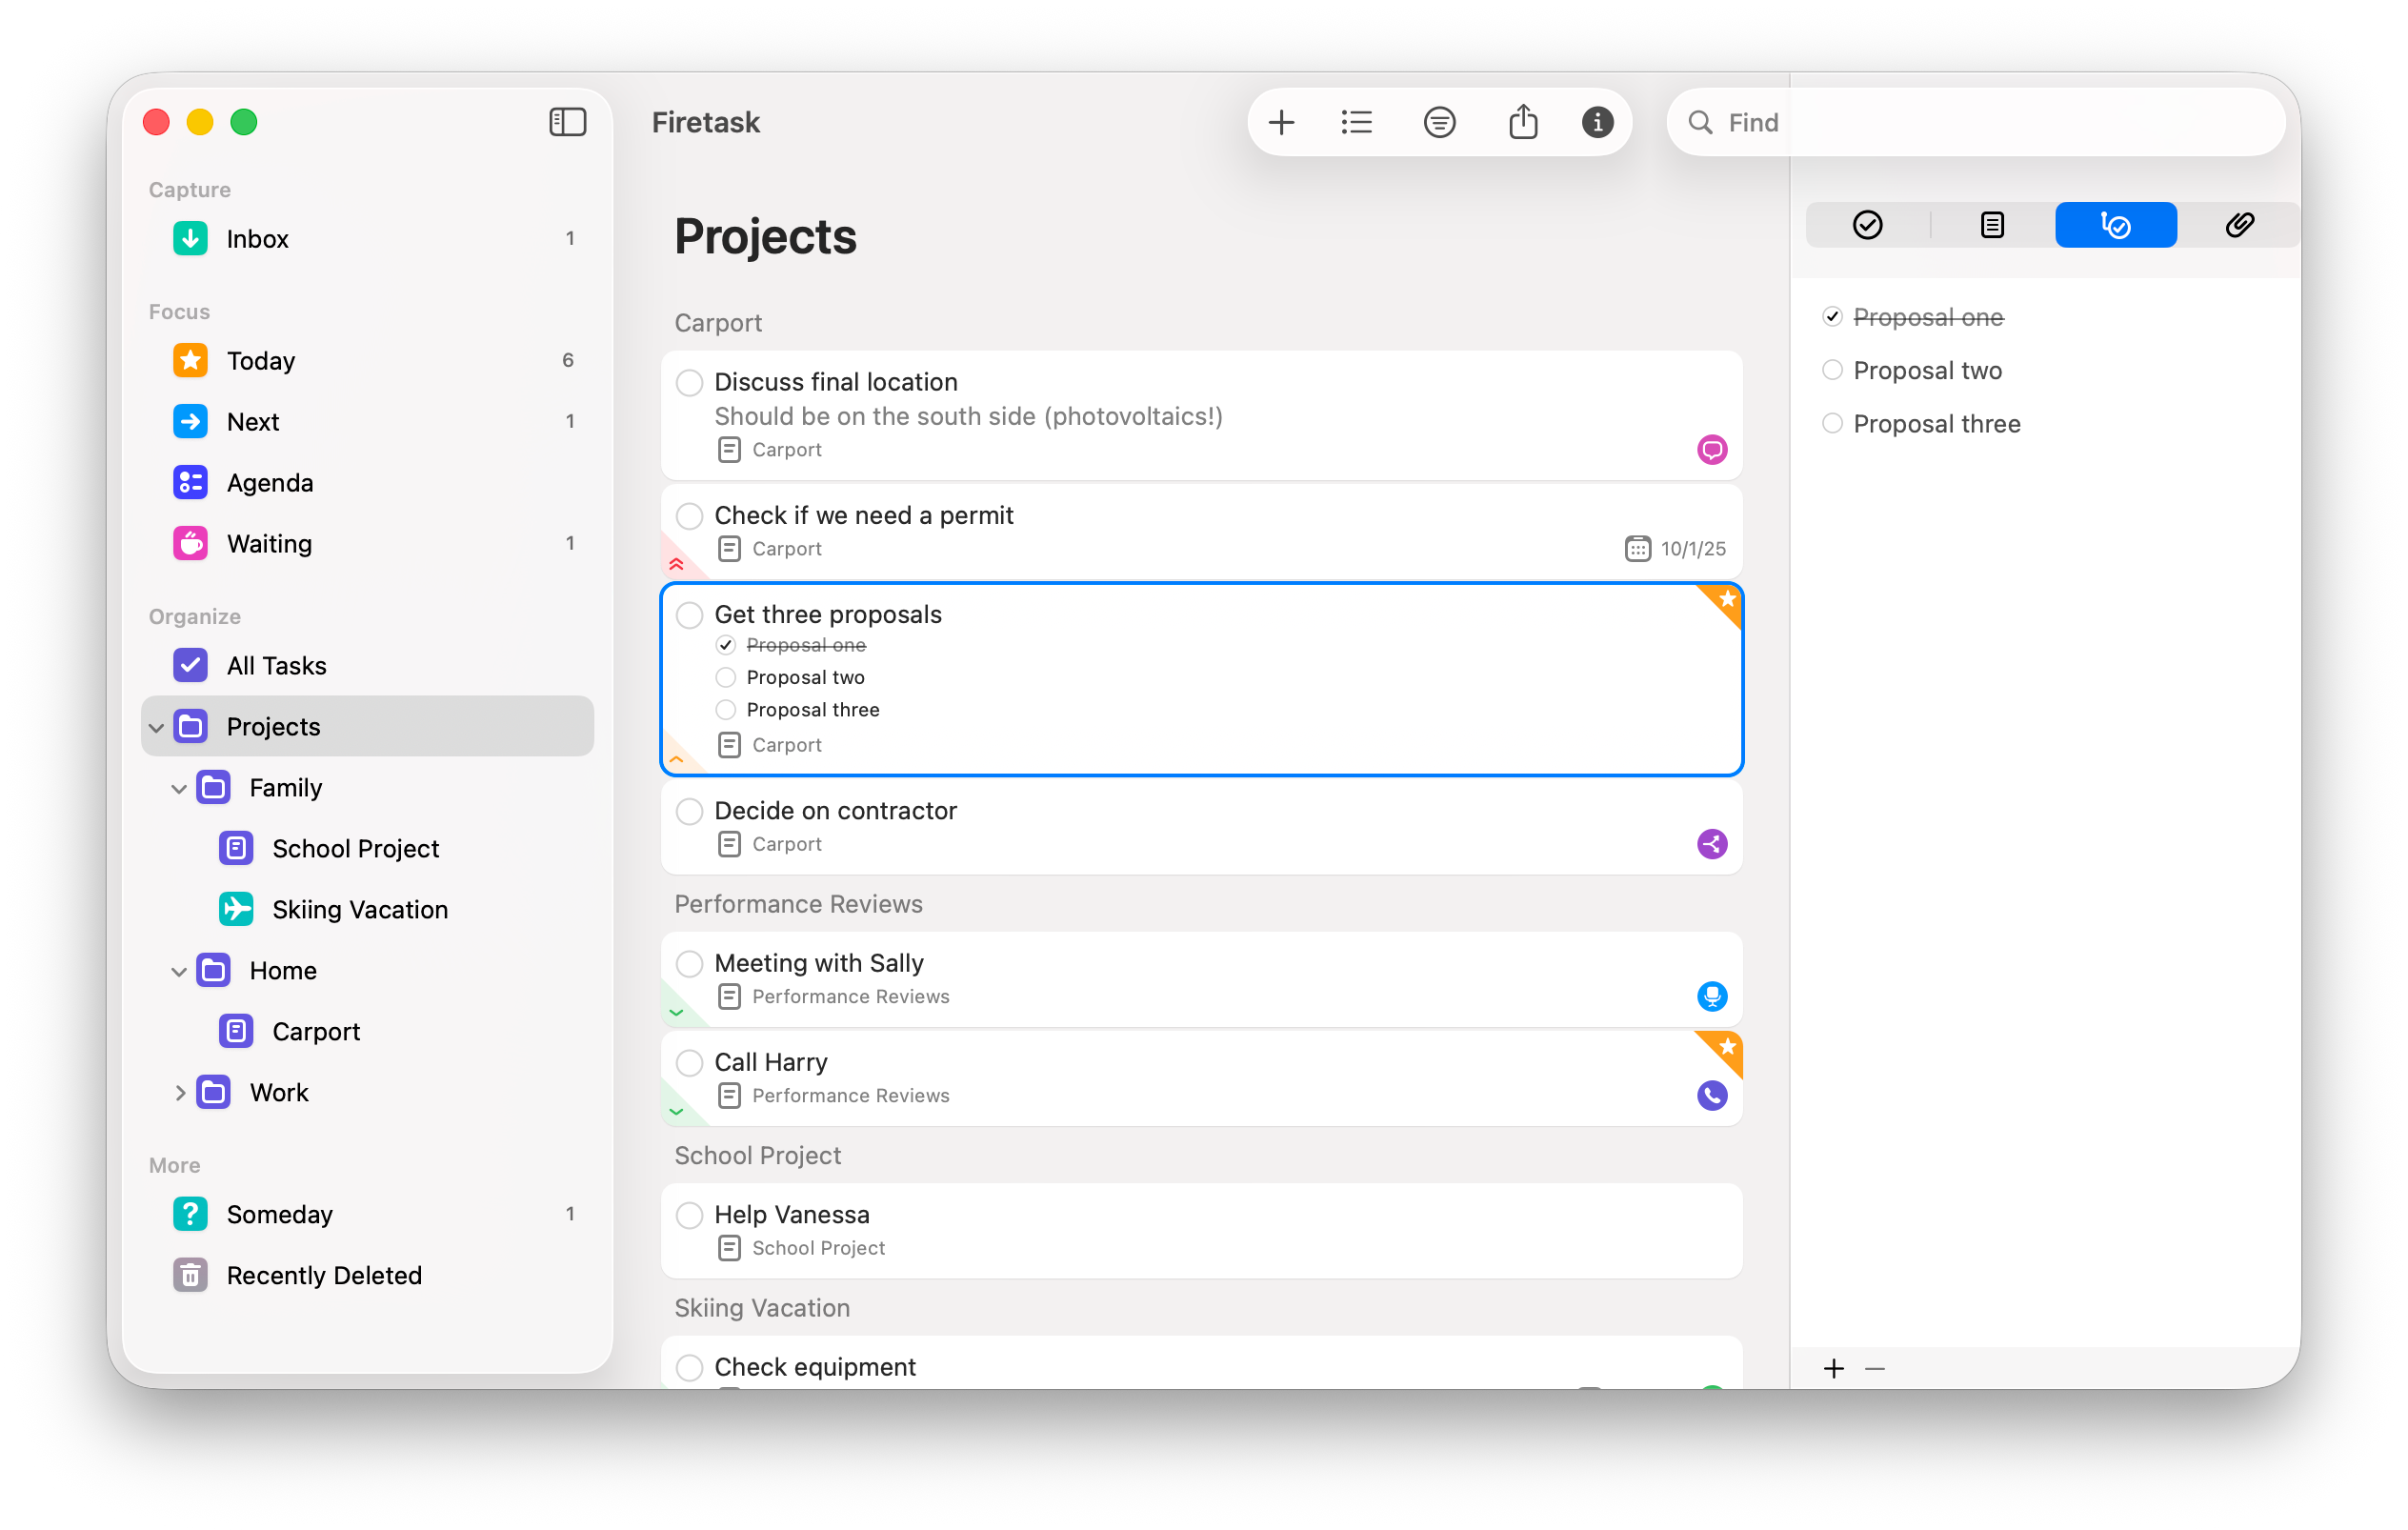
To-Dos
Sometimes you need to perform a number of steps in order to complete a more complex task -- this is where to-dos come into play. To-dos allow you to break down a task into a number of subtasks where each to-do has its own status.
To-dos are intentionally limited to just a title and a status in order to keep them simple and lightweight. If all to-dos of a task have been completed it does not necessarily mean that the task itself is done, but completing a task will also auto-complete all still open to-dos.
You can create to-dos using the to-dos tab of the task detail view, or inline via the CMD+T keyboard shortcut on the Mac. These views also allow you to freely rearrange the order of to-dos within a task via drag & drop.
In earlier versions of Firetask to-dos were called "actions".
Attachments
Starting with version 5, Firetask supports two types of attachments:
- Link attachments only store link destinations (URLs).
- File attachments really store file contents.
You can create attachments by using the "+" or "New Attachment" buttons in the attachments tab or via drag & drop. If you drag a file onto a task Firetask will create a file attachment; if you drop a link (e.g., from the Safari titlebar) it will create a link attachment.
The presence of attachments on a task is indicated by a small paper clip icon; tapping this icon opens a popover with a list of attachments.
File attachments are only available via subscription; the free upgrade from Firetask 4 only unlocks Firetask 4-level functionality limiting attachments to just links.
Lists
Lists are the central concept of how tasks are organized in most task management systems - especially in GTD. Every task belongs to a list.
Firetask comes with three built-in lists:
- Inbox is the GTD inbox list where you typically quickly capture new tasks and ideas.
- Someday is a special task list where you put tasks that you may want to do in the future, but are not sure yet.
- General is the your general task list where all actionable tasks go that do not belong to a specific project.
In addition, projects and templates are special types of lists.
Projects
If you need more than a couple of tasks to get something done you might want to create a project. Additionally, projects are generally a good way to structure your task management with regards to content.
You can create a new project using the "..." navigation menu on iOS or using the File menu on the Mac. A project needs a unique name, everything else is optional:
- Name. The Name of the project must be unique. If you get an error that a project name is not unique also check your completed and canceled projects.
- Status. The Status of the project.
- Portfolio. An optional portfolio that project belongs to.
- Category. An optional category for providing GTD context; a project category also serves as a default category for any tasks created in the project.
- Priority. The project's priority (the default value is Medium); like the Category also the project priority is applied to new tasks created in the project.
- Start. An optional Start date of the project.
- Due. An optional Due date for the project.
- Short Notes. Short notes show up below the title of a project in the project task list.
- Notes. The Notes area allows you to describe your project in more detail.
Just like tasks, projects also keep track of their creation, last modification, and completion dates via their Created, Modified, and Completed properties. Just like for tasks you can view the most relevant date on the bottom of the project's details.
Projects basically support the same statuses as tasks and to-dos, but the In Progress status is called "Active", as this is more appropriate naming in the project context:
- Not Started. Tasks of projects that have not been started yet (Not Started) do not show up in the Focus area.
- Active. Only tasks of Active projects show up in the Focus area in order to to not distract you from currently not relevant projects.
- On Hold. The On-Hold status allows you to put a project on hold, i.e., its tasks are no longer visible in the Focus area, but it is not canceled, you will continue working on it at a later time.
- Completed. Projects with status Completed do no longer show up in the project navigation. You can look up completed projects in the "Projects Archive" in the Preferences area which also allows you re-activate completed projects if needed.
- Canceled. The Canceled status works in the same way as Completed, but indicates that you canceled the project instead of finishing it.
The project status can be changed either in the project's detail view, or by tapping/clicking or long-pressing/right-clicking on the project status icon in the project task list title bar -- very similar to how task status changes work.
Please note that if you delete a project it is gone forever (including all of its tasks, but of course with explicit user confirmation)! Please make sure that you really do not need the project anymore if you delete it.
Templates
You might have projects that always follow a specific pattern, i.e., you always need to complete the same or very similar tasks in order to finish these projects. Here is where templates come into play.
Templates are basically lightweight, reuseable projects. They support nearly the same set of fields as projects do.
You create templates very much in the same way as projects -- using the "New Template" navigation menu item on iOS, or using the "New" File menu item on the Mac. Alternatively, you can save an existing list of tasks as a template. You do this via the share button in the toolbar. On the Mac we provide you with additional flexibility: you can select a number of tasks from any task list and use the "Save as Template..." menu item under "Tasks" to just save your selection.
In order to insert the contents of a template into a task list you long-press the "+" icon that you normally use to create new tasks on iOS. On the Mac you use the "Paste from Template" menu item located under "Edit" in the main menu: the tasks from the template will be inserted at the currently selected task list item (or at the tail of the list if no task is selected).
Templates are a simple, but very powerful concept and can save you a lot of time -- you should definitely check them out if you have not done so yet.
In earlier versons of Firetask, templates were called "checklists".
Portfolios
Some users will have many projects, or different areas of work (e.g., the company you are working for vs. private tasks). This is where portfolios can be very handy: they let you cleanly structure your projects via one level of project "folders". We intentionally decided for only a single level, so we can streamline navigation and keep things simple and intuitive.
You create portfolios in the same way as projects and templates: using "New Portfolio" from the navigation menu on iOS and using the File menu on the Mac.
In order to assign a project to a portfolio you have to set the Portfolio property in the project's detail view. Alternatively, you can use drag & drop to drag a project under a portfolio in the project navigation on the Mac.
You delete portfolios via their context menu -- accessible via long pressing on iOS.
You can only delete a portfolio if it is empty. Do not forget to also check the Archive for completed and canceled projects when trying to delete a portfolio.
Categories
Unlike projects, categories are intended to provide context, rather than structure. You can create a new category using "Organizer" view: Simply press the "+" button in the "Categories" area. You open the Organizer from the navigation menu on iOS and via the Window menu on the Mac.
A category needs a unique name, a color and an optional indicator icon; you can also add notes to a category.
![]()
Categorizing tasks allows you to provide GTD context information, so you can select tasks to work on based on the environment and context you are currently "in". For instance, you can mark all tasks that you need to do when you are at home as "Home", while marking all tasks as "Office" that can only be done in your office. Other examples include "Computer" indicating that you need your computer to complete certain tasks.
You assign categories in the project and task detail views using the "Category" property. On the Mac you can also use the right mouse button to assign categories via the task context menu, use the touch bar category icon, or use what we call "command tagging". Command tagging allows you to quickly specify a category by typing the "#" character following the category name while editing a task title; the category will be set when you leave the title field.
Contributors
Contributors are primarily used to organize your delegated tasks using the "Waiting" list: Every time you delegate a task, you simply assign this task to a contributor.
Contributors are typically created automatically, e.g., when you select a contact imported from the Contacts app and assign it to a task (using the Assigned To property), or if you use command tagging and type the "@" character followed by a contributor name that does not exist yet when editing a task title.
If you want to create a contributor manually you can do this in the "Contributors" area in the Organizer. There you can also manage your contributors, e.g. adjust names, or deleting a contributor that you no longer need.
Tags
Starting with Firetask 5, you also have the ability to use tags to further categorize your tasks. Tags are entered via the usual "#tag" syntax directly in the notes of a task. You can then use these tags to narrow down search results using the same #tag syntax in the search field.
Like contributors, tags are typically created automatically and you can also manage them using the "Tags" area of the Organizer.